TLDR– Github solution to set this up: https://github.com/AddEleven/lets-encrypt-azure-automation
I recently set up an Azure App Service with an Application Gateway frontend. Everything was working smoothly with Azure App Service Managed Certificates until I hit a major roadblock: you can’t export these certificates, making them completely useless for integrating with Azure App Gateway’s frontend TLS requirements.
Looking for alternatives, I investigated other Azure certificate solutions like Key Vault Generated Certificates and Azure App Service Certificates. Once I looked at the pricing and being the cheap bastard frugal engineer that I am – I immediately started searching for more cost-effective options.
Enter Let’s Encrypt: offering essentially the same security features as paid certificates, but completely free. The only downside? A slightly more complex management process. But that’s exactly what led me to create this solution. In this post, I’ll walk you through my certificate selection journey (spoiler alert: Let’s Encrypt wins) and share the open-source automation solution I built to make the entire process painless.
Comparing Certificate Options
Firstly I will outline my decision making process on selecting a solution for my certificate problem. I wanted to try and stick with a fully managed solution (preferably all within Azure) so I didn’t have to worry about certificate renewals or any integrations with other services. But my main focus was on security and cost.
I initially found the different certificate management services in Azure to be a bit confusing, as well as having a severe lack of documentation or guidelines. I decided to compare the following options, which seems to be the extent of TLS certificate systems within Azure:
- Azure App Service Certificates – A paid, Microsoft-managed TLS certificate service that you can integrate with Azure services.
- Azure App Service Managed Certificates – Free and fully managed TLS certificates for App Service with automatic renewal but limited to App Service and not exportable.
- Azure Key Vault Generated Certificates – Premium certificates issues by commercial CAs through Key Vault with flexible usage but significant cost.
I then kept seeing Let’s Encrypt being brought up as a possible solution and free of charge. I thought a free certificate would have some sort of catch with security or certificate generation limits, so I decided to add that to the comparison just to see. Results below.
| Feature | Azure App Service Certificates | Azure App Service Managed Certificate | Key Vault Generated Certificate | Let’s Encrypt Automated Solution |
| Cost (per certificate) | $70-300+ per year | Free | $300-1000 per year (depends on CA) | Free |
| Certificate Authority | DigiCert and GoDaddy | DigiCert | DigiCert and GlobalSign | Let’s Encrypt (Internet Security Research Group) |
| CA Trust Status | Universally trusted | Universally trusted | Universally trusted | Universally trusted |
| Multi-domain (SAN) and wildcard (*.example.com) certificates supported? | Yes | No | Yes | Yes |
| *Certificate Validation Types (Domain Validation, Organization Validation, Extended Validation) | DV, OV, EV | DV | DV, OV, EV (Depends on provider) | DV only |
| Flexibility | High (exportable, usable with all services) | Very limited (App Service only, not exportable) | High (Usable across Azure) | High,(exportable, usable anywhere) |
| Expiry Period | 1-2 years | 6 months | 1-3 years | 90 days |
| Automated Renewal | Yes (managed by Azure) | Yes (fully managed) | Yes (through Key Vault) | No (have to use custom automation) |
| Setup Effort | Low | Lowest | Low | Medium-High (requires setup) |
| Management Overhead | Low | Lowest | Low | Medium (monitoring required) |
| Scale Costs | Linear increase with number of certificates | No additional costs | Linear increase with number of certificates | No additional cost |
| Implementation Time | Hours (approval process) | Minutes | Hours | Hours (initial setup) |
*Domain Validation – Verifies that you control the domain, typically through DNS record or file upload., Organization Validation – Verifies domain ownership plus organisation legitimacy through business records and legal checks. Adds organisation details to certificate.
Extended Validation – Highest level of validation, requiring legal documentation, physical address confirmation and thorough business authentication. Displays organisation name in address bar.
Following my research, I discovered that a Let’s Encrypt solution provides virtually the same security and usability features as a paid certificate, but without any cost.
In terms of security, organizational and extended validation were not requirements for the site I was setting up. These appeared to be the only notable advantages of paid certificates, alongside their longer validity periods. However, shorter certificate lifetimes are actually considered a security best practice, as they minimize the impact of key compromises. Therefore, the shorter lifetimes turned out to be a benefit rather than a drawback.
Given I was prepared to undertake the necessary setup and management tasks and automate the process to the greatest extent possible, it became an obvious choice.
If you’re like me and still unsure about the credibility of these certificates—wondering whether major websites actually use them—take a look at a few notable sites currently relying on Let’s Encrypt certificates:
– https://stackoverflow.com/
– https://www.nsa.gov/
– https://www.mozilla.org/en-US/
If it’s secure enough for the NSA, it’s definitely secure enough for my website!
My Requirements
For my solution I had several main requirements:
- The process for generating and renewing certificates had to be fully automated, eliminating any need for manual intervention.
- The solution should scale easily in order to manage multiple domains and environments.
- I wanted to use Azure Key Vault to store my generated certificates. Additionally, the certificates needed to be full-chain certificates compatible with Azure App Gateway and App Service.
How My Solution Works
I’ve created a GitHub repository containing everything needed to set up this solution. The repository’s README provides instructions for configuring it in your environment, including details on permissions and secret/variable values.
The solution works in the following way:
- Workflow Trigger
- Runs on a schedule (1st and 15th of each month)
- It can be triggered manually, with the option to include a staging parameter. This parameter instructs Let’s Encrypt to generate a staging certificate instead of a production certificate. Staging certificates are intended solely for testing workflows and processes-they are not suitable for use in any environment, including Dev, Test, Staging, or Prod. Production certificates must be used across all environments.
- Certificate Check
- Checks if a certificate (given a set of input variables) exists in Key Vault. If it does, calculates the days until expiry.
- Skips renewal if more than 30 days left. If not, move to the new certificate generation step.
- Certificate Generation
- Uses Posh-ACME to interact with Let’s Encrypt and generate a Full Chain PFX Certificate.
- Uses Azure DNS for domain validation using the Posh-ACME Azure DNS plugin.
- Key Vault Storage
- Imports newly created certificate to Key Vault with generated name
cert-{domain-name}.
- Imports newly created certificate to Key Vault with generated name
- Version Management
- Identifies the newly imported certificate.
- Disables all older versions of the certificate.
After running the Github Action, you should end up with something like this: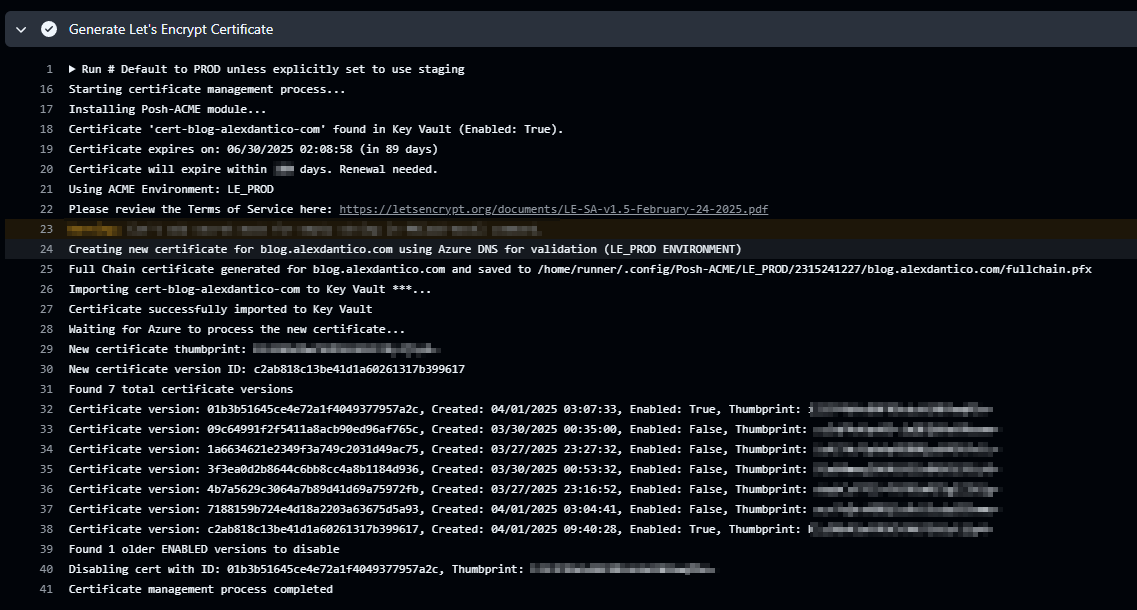
As outlined above, the script begins by checking if a certificate exists. If a certificate is found and its expiry is within the expiry threshold (30 days), a new certificate is generated. The script validates the domain using Azure DNS, creates the certificate, and uploads it to Azure Key Vault. Once the upload is complete, any older versions of the same certificate in Key Vault are disabled.
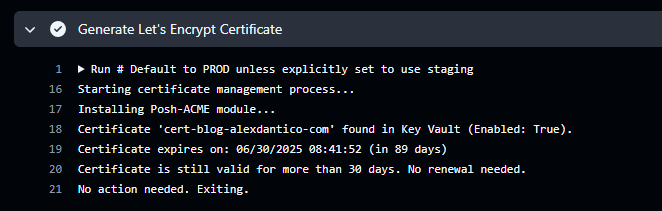
If the Action runs and the certificate’s expiry date exceeds the expiry threshold, the certificate generation process is skipped, and you’ll see a corresponding message
In Azure Key Vault, you should ultimately see one version of the certificate enabled, with all previous versions in a disabled state if all goes to plan.

Integrating with Azure App Service and Application Gateway
At last; we can configure Azure App service and Application gateway to use these certificates for its TLS termination. There are some nuances with how this needs to be setup which is a bit unclear from the documentation; so I will give you a quick walkthrough of this setup and some helpful tips.
Setting up Azure App Service to use Azure Key Vault references for ‘Bring your own certificates (.pfx)
So this confused me for a bit. In order to use an Azure Key Vault reference in the Bring your own certificates section in Azure App service, you need to provide access to the generic Microsoft Azure App Service Service Principal, rather than lets say the Management Identity assigned to your Azure App service. This is documented here but it is still not very clear as to why this is required. My best understanding is that this is because the certificate deployment process is managed by the App Service platform itself, not your specific app.
So with that in mind; you will need to give the following App Service these permissions:
– Microsoft Azure App Service (App ID: abfa0a7c-a6b6-4736-8310-5855508787cd)
– Access Policy Permissions:
– Key Vault Secret: GET
– Key Vault Certificate: GET
OR
RBAC Permissions:
– Key Vault Certificate User
Once permissions are set, you can bind the Key Vault certificate to your App Service’s custom domain.
Configuration of Azure App Gateway
Firstly, you will need to setup Azure App Gateway with a User-Assigned Managed Identity, and then give it the same permissions above in Key Vault:
Access Policy Permissions:
– Key Vault Secret: GET
– Key Vault Certificate: GET
OR
RBAC Permissions:
– Key Vault Certificate User
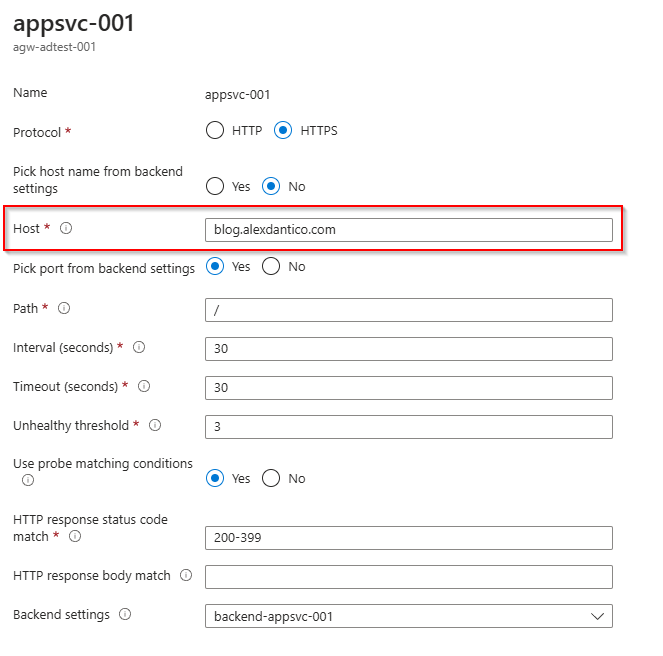
The next thing to remember is you must configure the Application Gateway with a custom health probe. This is necessary because App Services with custom domains reject requests that don’t include the correct hostname.
Default health probes use 127.0.0.1 as the hostname for backend pool checks, which fails for custom domains. To resolve this, define a custom health probe where the Host is set to your App Service’s custom domain name.
For this reason, we need to create a custom health probe that is configured with the correct custom domain name as its host name.
It should look somewhat like the following, where our host name is set to our custom domain value that we set in our App Service.
You will then need to add an A record to your DNS server to resolve the following:
<your-custom-domain> : <public-ip-app-gateway>
Finally…
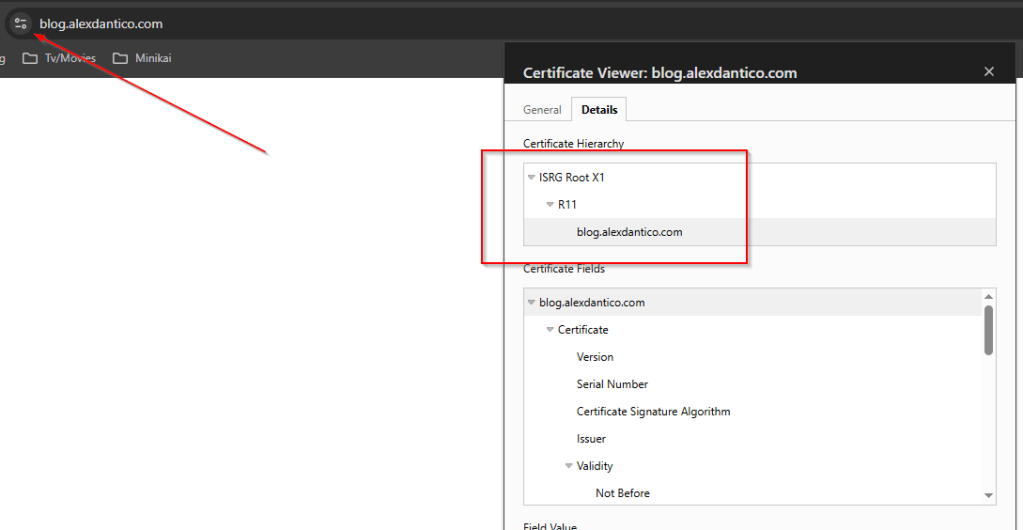
The final result will be a fully operational Application Gateway frontend paired with an Azure App Service backend, achieving seamless end-to-end TLS encryption. This ensures a consistent chain of trust, all using the same Let’s Encrypt certificate.
When you navigate to your domain, you should see the expected certificate information displayed correctly.
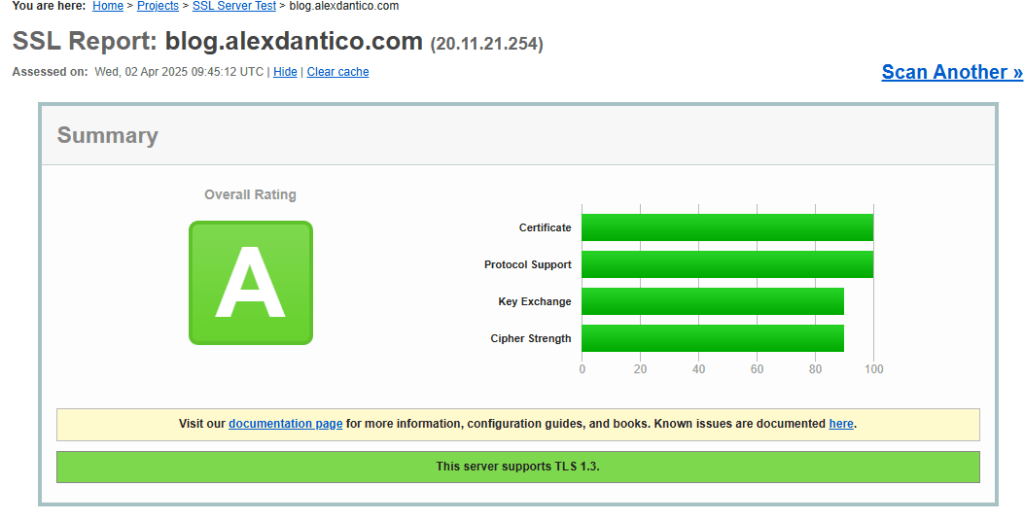
For some extra satisfaction you can go to https://www.ssllabs.com/ and check the SSL status of your site. This tool helps identify any certificate chain issues or other SSL-related concerns.
And that’s it. If you have any questions, be sure to leave them below. Hope this helps you out and most importantly saves you some money.

Leave a comment